Sunday, January 18, 2015
Analysis Of Current State Of Affairs And An Update
This last week has been spent mounting the frames to the building form. Ill cover that in a moment. There will be some pictures later in the posting as well.
During this last week, I kept running up against things that needed me to spend money in order to accomplish. Since I was fairly busy with other aspects of my life, I refrained from going out and spending any money on the boat.
This got me to thinking about where I was headed and what I was going to be able to accomplish. One of the biggest hurdles I have to moving forward right now is lack of more lumber to continue building the structure. Readers may remember that I am building this boat out of mahogany and marine grade plywood. Both of these are quite expensive (especially the plywood), so in the back of my mind has been this desire to save enough money to make the purchase.
This is not as simple as it sounds because I have to make a four drive to Houston in order to get the lumber I need, so there is the cost of the trip to add into the cost of the lumber. Furthermore, since it is a long trip, I am inclined to want to get as much lumber as I can when I go there. That means I need to save more money.
But heres the rub. I am continually working on the boat on the remaining things I can do and all of these keep taking money. Usually smaller amounts, but nearly constant and its been difficult to get the savings going for the lumber.
So today, I sat down and started analyzing the current state of affairs. I had several goals with this analysis. First, I decided to limit myself to what I can reasonably expect to complete by next spring. I wanted to see what I had left that I could do without spending any money (or spending very little money). I wanted to try and determine what I did need to buy. I also wanted to determine what I wanted to accomplish in the next 6 months and what roadblocks / dependencies where in the way of accomplishing those tasks.
The list of no cost / low cost tasks is fairly short but probably enough to last a month or possibly two. The list of tasks dependent upon money or other tasks was longer. Most of the dependencies came down to a need for more lumber and hardware. The list of purchases needed mainly consisted of lumber and hardware, with a few hand tools and lots of clamps thrown in.
All of the non lumber purchases are dependent upon more lumber in order to make use of them, except for a few pieces of hardware. The silicon bronze hardware I need is fairly expensive and has to be ordered online (thus there are shipping costs involved). I feel that I need to order all of that hardware at the same time to avoid paying too much for shipping.
I reasoned that buying the hardware now just so I could accomplish a few minor tasks would not be worth it at this time because it would further delay getting the lumber. So for the next several months, I am going to concentrate on the no cost tasks and try to save as much money as I can . I hope to make the trip to Houston in late October or November to buy the lumber.
So for most of the remainder of this year, my updates will consist of the smaller tasks I have to accomplish. Some of these will be more significant than others and I will try to make the articles as interesting as I can.
As for the update, I have finished mounting all the frames to the building form except for frame 6 which mounts to the stem, The stem is not mounted to the form yet but I have got it fitted and partially ready to go. Unfortunately, mounting the stem permanently is one of those tasks dependent upon other tasks or money.
The transom frame is mounted to the building form but will have to come back off before final gluing of all the longitudinal pieces of the structure. This is because the transom still needs to be completed (adding plywood, encapsulating). Again, one of the tasks dependent upon money.
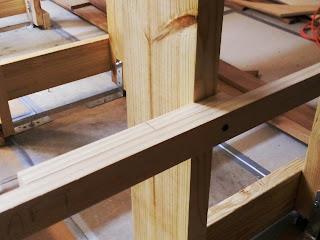
Mounting the frames primarily consisted of adding wooden cleats (small blocks of wood) and connecting them to the frame and the building form. The other task was adding a brace across the open end of the frames and connecting this brace to the building form as well.
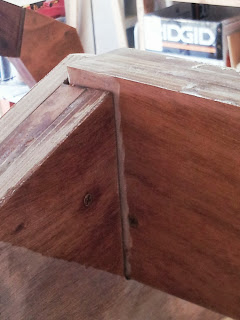
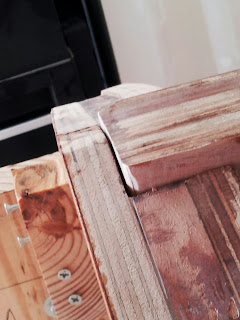
The following photo shows the cleats. The frames appear to be mounted securely and there is no movement, but I am not totally sure about the strength of these cleats. I may go back and replace these with something a little sturdier.

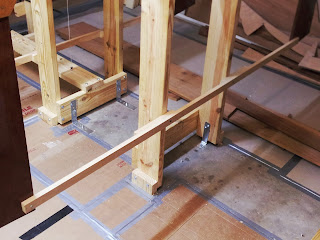
The braces across the open end, were nice straight pieces of pine connected to the vertical members of the frame and connected to the building form legs. You can see that in the next two pictures.
I also took measurements from various points on the floor and building form and compared them to the measured height of the drawn line. I wanted to insure that I had projected it to the correct location. Once I was satisfied with that location, I measured down 40 inches and drew another line. This 40 inches is the distance indicated on the plans for the front forward piece of the stem.

During this last week, I kept running up against things that needed me to spend money in order to accomplish. Since I was fairly busy with other aspects of my life, I refrained from going out and spending any money on the boat.
This got me to thinking about where I was headed and what I was going to be able to accomplish. One of the biggest hurdles I have to moving forward right now is lack of more lumber to continue building the structure. Readers may remember that I am building this boat out of mahogany and marine grade plywood. Both of these are quite expensive (especially the plywood), so in the back of my mind has been this desire to save enough money to make the purchase.
This is not as simple as it sounds because I have to make a four drive to Houston in order to get the lumber I need, so there is the cost of the trip to add into the cost of the lumber. Furthermore, since it is a long trip, I am inclined to want to get as much lumber as I can when I go there. That means I need to save more money.
But heres the rub. I am continually working on the boat on the remaining things I can do and all of these keep taking money. Usually smaller amounts, but nearly constant and its been difficult to get the savings going for the lumber.
So today, I sat down and started analyzing the current state of affairs. I had several goals with this analysis. First, I decided to limit myself to what I can reasonably expect to complete by next spring. I wanted to see what I had left that I could do without spending any money (or spending very little money). I wanted to try and determine what I did need to buy. I also wanted to determine what I wanted to accomplish in the next 6 months and what roadblocks / dependencies where in the way of accomplishing those tasks.
The list of no cost / low cost tasks is fairly short but probably enough to last a month or possibly two. The list of tasks dependent upon money or other tasks was longer. Most of the dependencies came down to a need for more lumber and hardware. The list of purchases needed mainly consisted of lumber and hardware, with a few hand tools and lots of clamps thrown in.
All of the non lumber purchases are dependent upon more lumber in order to make use of them, except for a few pieces of hardware. The silicon bronze hardware I need is fairly expensive and has to be ordered online (thus there are shipping costs involved). I feel that I need to order all of that hardware at the same time to avoid paying too much for shipping.
I reasoned that buying the hardware now just so I could accomplish a few minor tasks would not be worth it at this time because it would further delay getting the lumber. So for the next several months, I am going to concentrate on the no cost tasks and try to save as much money as I can . I hope to make the trip to Houston in late October or November to buy the lumber.
So for most of the remainder of this year, my updates will consist of the smaller tasks I have to accomplish. Some of these will be more significant than others and I will try to make the articles as interesting as I can.
As for the update, I have finished mounting all the frames to the building form except for frame 6 which mounts to the stem, The stem is not mounted to the form yet but I have got it fitted and partially ready to go. Unfortunately, mounting the stem permanently is one of those tasks dependent upon other tasks or money.
The transom frame is mounted to the building form but will have to come back off before final gluing of all the longitudinal pieces of the structure. This is because the transom still needs to be completed (adding plywood, encapsulating). Again, one of the tasks dependent upon money.
Mounting the frames primarily consisted of adding wooden cleats (small blocks of wood) and connecting them to the frame and the building form. The other task was adding a brace across the open end of the frames and connecting this brace to the building form as well.
The following photo shows the cleats. The frames appear to be mounted securely and there is no movement, but I am not totally sure about the strength of these cleats. I may go back and replace these with something a little sturdier.

The braces across the open end, were nice straight pieces of pine connected to the vertical members of the frame and connected to the building form legs. You can see that in the next two pictures.


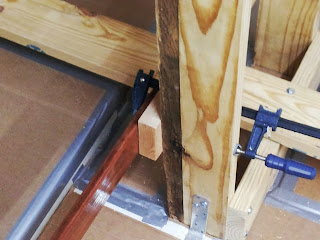
Frame 5 (one of the two frames I dressed up several months ago), already has a cross member that will eventually form the roof of the berthing area at the bow. Since this will be visible in the cabin, I didnt want to drill any holes to brace it. Instead, I clamped it to the building form. The frame is still mounted to the form using cleats, only the bracing was handled differently.

The stem needs to be mounted so that the forward upper section (where the breasthook eventually will attach) is a certain distance down from the reference line on the building form. The reference line is the tops of the long horizontal boards making up the building form. Since the stem extends quite a distance beyond these horizontals, I needed some method to get the height down to the breasthook.
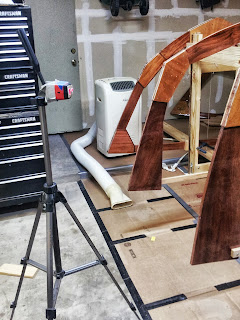
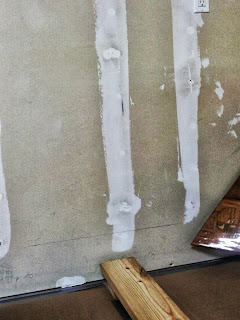
What I did was mount a laser level on a tripod and shot a line over an extended piece of the horizontal members of the building form. I had to insure that the laser was level and the same height as the horizontals. I did this by moving the laser up and down until it rested right on the top edge of the form. I then then rotated it so that the line was projecting on the far wall where the stem was. I marked that line on the wall and insured it was level.

I also took measurements from various points on the floor and building form and compared them to the measured height of the drawn line. I wanted to insure that I had projected it to the correct location. Once I was satisfied with that location, I measured down 40 inches and drew another line. This 40 inches is the distance indicated on the plans for the front forward piece of the stem.

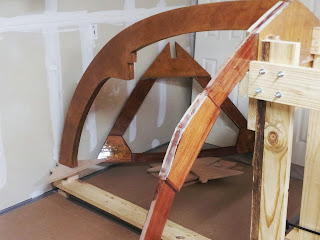
I added some scrap wood to support the stem at that line and then set the stem in place o see how it looked. I had to add the breasthook part under the stem (triangular plywood piece under the stem in the photo).


Because of the previous encapsulation work down on the stem and frame 5, the stem would no longer fit into the slot cut out for it on the frame. So I had to do some cleaning up of the epoxy resin and a bit of widening in order to get the stem to set in place correctly. You will notice that parts of the stem stick up above the frame. That is intentional as all of this will be faired later in construction to provide a nice flat mating surface for the plywood skins. The gaps in fitment are to allow some room for the thicken epoxy that will be applied when these parts are glued into position.


So that is it for now. I feel pretty good about the progress made over the last two months and hope that the delay from saving for lumber will not prevent me from making my goal of flipping the hull next summer. Take care .
Subscribe to:
Post Comments (Atom)
No comments:
Post a Comment